Building a Poker Table
After shopping around for chips for my poker home game, I saw a few poker layouts / table tops that you could buy online. I am in Australia, so these table tops would cost me a small fortune to ship from the USA, so I decided to build my own.
The following poker table plans on how to build a poker table should be used as a guide only. These poker table plans are copyright and can not be used on any other site without written authorization. You will learn how to build a custom poker table using poker table felt and other poker table supplies.

A few searches later, I had seen about 10 other home built tables. Round poker tables, oval shape (rounded edge rectangles actually) and some octagonal poker tables, the choices were endless, well not really, the choice was 1 of 3 types.
I decided to build the rounded rectangle, the biggest table I could. I intended to build a table top only, one that I could store on its side in the garage when not in use, but could slot straight over the top of my dining table on game nights.
I also chose to build my table with an exposed wooden section, which I call the “beer rail”. You could build this project without the “beer rail” in a single day. The exposed stained wood takes considerably more time (waiting for stain and clear lacquer coats to dry adds at least 2 days)
There were 3 main stores I needed to visit for this project, a hardware store, a fabric store, and a foam supplier.
In Australia, I shopped at Bunnings (Australia’s largest hardware chain), Spotlight (Australia’s largest fabric, craft and homemaker superstores) and Clark Rubber (more than just foam and rubber apparently).
I sourced the following building materials, fabric and foam, please note at the end of the project I discovered it may have been easier with slightly different measurements etc so read the final thoughts section for more info.
I will show all metric measurements and expenses in local currency (AU$ Australian Dollars) but will convert to imperial measurements and US Dollars (US$) where possible, try not to get confused.
At the time of writing:
- One (1) Australian Dollar equals approximately $0.70 US cents.
- There are 25mm (millimeters) to every 1″ (inch)
The materials required are:
HARDWARE STORE (Bunnings Australia)
- 1 x MDF 12mm (1/2″) 2400 x 1200 (8′ x 4′) = AU $40 (US $30)
- 1 x Ply 12mm (1/2″) 2400 x 1200 (8′ x 4′) = AU $55 (US $40)
- 1 x Packet Wood Screws 100 x 25mm (1″) = AU $5 (US $3.50)
- 1 x 250ml Wattyl Interior Stain = AU $5 (US $3.50) **
- 1 x 250ml Wattyl Estapol Gloss (Clear Lacquer) = AU $5 (US $3.50) **
- 1 x Packet Staples 1000 x 12mm (1/2″) = AU $5 (US $3.50)
- 1 x Spray Adhesive = AU $5 (US $3.50)
- 1 x PVA Wood Glue = AU $10 (US $7)
** Only required if you want the exposed wooden “beer rail”
FABRIC STORE (Spotlight Australia)
- 1 x White Vinyl 3000 x 1400 (10′ x 5′) = AU $40 (US $30)
- 1 x Length Blue Felt 2500 x 900 (8′ x 3′) = AU $15 (US $10)
FOAM SUPPLIER (Clark Rubber Australia)
- 1 x Foam 50mm (2″) 1500 x 1200 (5′ x 4′) = AU $99 (US $70)
- 1 x Foam EVA 6mm (1/4″) 2000 x 1000 (7′ x 3′) = AU $40 (US $30)
The total material cost is a little over AU$300 (about US$210).
The tools required are:
- Jigsaw (Main tool for shaping wood)
- Drill (Used once, for pilot hole for jigsaw blade)
- Orbital Sander or Sandpaper (For correcting your jigsaw handling inadequacy)
- Staple Gun (You will use every single one of those 1000 staples you buy)
- Friend (It is hard to stretch and staple the vinyl evenly by yourself)
 I am going to build a “beer rail” so I started with a top sheet of ply wood. If you didn’t want the beer rail, you could easily use two sheets of MDF (Medium Density Fiberboard). The first step is to mark out and cut the main shape of your table or table top.
Note: Ply wood usually has a “good side” and a “bad side” I am making all my markings on the bad side that has the printing on it.
I started with a 1200mm wide sheet so I came in 600mm from the side and the ends to find the midpoint for my oval arc. I put a screw in at this point which I tied a string to. The string had a pencil on the end (at the edge of the wood) which when pulled tightly you can draw a perfect arc all the way around like a big compass.
You can see one edge at the back is already cut off.
TIP1: I used string here, later I realised it was much easier to do this with a straight peice of wood (an offcut) or a broom handle etc. Screw the broom handle in at the midpoint and draw against the firm edge rather than relying on the string to stay tight.

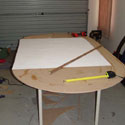
After cutting the curves off, I placed the top “template” over the bottom sheet of MDF. I traced around the table to make the peices fit evenly.

Cut the 4 corners off the bottom sheet of MDF. You can also see in this picture that I have drawn two inner arcs. These are for the beer rail and the padded arm rail. They are equal parts, 125mm each (5″). Which leaves me with a 700mm wide felt covered playing area.
Note: I had to sand the ply a bit as it is quite rough and makes it hard to do nice pencil lines when using string. Refer to TIP1 about string pencil lines.
125mm (padded rail) x 2 sides = 250mm
125mm (beer rail) x 2 sides = 250mm
1200mm wide sheet
250mm beer rail + 250mm padded rail = 500mm
1200mm – 500mm = 700mm (for felt section)

I have moved the bottom sheet of MDF to the side, its job is done until the final stage of my table.
I have made ONE cut with the jigsaw to seperate the PADDED RAIL section.
TIP2: In this step I drilled a hole (just big enough to fit the jigsaw blade through on the INSIDE EDGE of the padded rail. I drilled on the inside edge because I am covering the padded rail section so you won’t see the drill hole. If you did it on the center of the line, or on the outside of the line, this will ruin your beer rail!

I have completed the second full cut now, leaving only the felt section behind. Make sure you drill on the felt section part for the jigsaw blade to go in. You do not want the beer rail to have any pilot hole marks in it, refer to TIP2.

Trusty girlfriend starts staining my beer rail. This is the second oval piece. Note we are staining the “good side” of the ply. Apply the stain with an old peice of cloth in a circular pattern. Even cheap ply wood comes up looking pretty good!
TIP3: Try your stain on an offcut, make sure its not too dark as you want to see the wood grain. If you double up (re-coat) your stain, it will make it very dark. Note my test offcut in the middle of the table, see how the stain goes a little lighter after a few minutes soaking in.

While my assistant is applying the stain out side I am about to do the felt section. I applied some spray adhesive to the back of the 6mm (1/4″) EVA foam and to the ply wood.

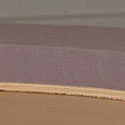
Cross section of 12mm (1/2″) ply wood and 6mm (1/4″) EVA foam. You can’t see the top layer of the ply so it looks like the EVA foam is more than half the thickness, but it is not. There was an option to buy 3mm (1/8″) thick foam, this would have been ok too I think. I went with the thick stuff because I wanted to.

Trim the edges off with a pair of sharp scissors or Stanley knife.

Lay out your felt, flip over your board and staple it on tight. I did this buy myself, getting a tight stretch with felt over 700mm was pretty easy, but you will need a hand doing the padded rail later.
I used cheap felt from a fabric store, see the final thoughts section for more tips.
I think one side (left) and one corner was stapled here, but you can see that it comes out pretty good. Cut off any excess felt once you have stapled it down.

There it is, all stapled down.

Here is my felt section, placed straight inside the beer rail. The stain is only been drying for an hour and is “touch dry” but I had to see how it looked. There is also no lacquer (clear coat) on it, this is where the delay happens, I have to sit out for 24 hours before a light sand and applying some clear estapol (polyurothene).

In comes the 50mm (2″) foam!

I am overcutting my foam by 25mm (1″) to make a rounded edge off the outside edge. Here you can see I have marked out 2 x 150mm (5″) wide lengths for the side parts of the rail. This is on the 1200mm long side of my foam, so I am going to end up with 2 peices of 150mm x 1200mm lengths. This leaves me with a 1200mm x 1200mm square to do my end bits.
Ok here is where I made my first mistake. I wanted to cut 25mm (1″) oversize so I actually needed a 1250mm x 1250mm peice left over. I was 50mm (2″) short in length and width which meant I had to do some wacky cutting and make and extra peice to fit.

See on the far side of the half circle it wasn’t quite enough to get the extra 1″ padding. I had to make an extra little bit from the offcuts.

Ok it kind of came out something like this, you can see on the right there that little extra peice I had to make. DONT make this mistake try and make this in as little amount of peices as possible as the joins are softer under the vinyl.
This is the foam glued down with normal PVA wood glue (white stuff that drys clear) to the padded rail section of wood.
I used a kitchen knife to make all the cuts because my jigsaw wouldn’t do a neat job, maybe I needed a special blade. The guy at the foam shop uses a jigsaw with a dual blade like an electric kitchen knife. He said the electric kitchen knife would do the best job, I didn’t have one, but by the time I was half way through hacking up my foam, I would have paid $1000 for one. Just go and buy one before you start, they are about AU$30 (US$20)
TIP4: Do not glue between the joins. The PVA wood glue dries clear, but it also dries very stiff and hard and you can feel it through the vinyl. If you need to hold those edges together, just use the light spray adhesive.
Shows a cross section of the ply and foam. A remarkably neat cut too!

Applied a coat of clear lacquer after a light hand sand with a fine grit paper. You just want to remove the small fibers that have lifted when the stain has dried. You should sand before the first coat of lacquer, and after the first coat. After the first coat of clear lacquer, you want to flatten out any bumps and remove any more lifted fibers. Then apply another coat, and then another one for good measure. It will be nice and shiny.
Note: It takes about 12 hours at least between coats, depending on temperature etc. This is what will prevent you from completing this project in a day.

Ok here is a little something I put together for the viewers. I built this sample rail cross section purely for illustration purposes. You can see in the picture, everything will sit on top of the MDF, the foam is glued to the ply then the vinyl is stapled underneath the ply from the inside of the rail first. Once its all in place on top of the MDF then the vinyl goes all the way down the outside edge and is stapled to the underneath of the MDF.

Ok here is my straight edge circle ruling technique. No more of that crazy pencil on a string stuff, I am using a broom handle! I have marked out the vinyl edges, full half circles 500mm (20″) of vinyl width, giving me more than enough room to staple on either side of the foam.

The full table layout. At the moment its in 4 peices. I ended up cutting those end peices in half making it easier to fold under and reducing the gathering. This also meant that there wasnt enough to do the overlap in the middle so I created a couple of end belts to seal the ends.

The rail in place, I am going to be stapling the INSIDE of the rail only until I turn it over and apply it to the main table section.

Ok here are those end belts being cut out so that I have enough to cover the end middle.

Well yeah, I should have taken a few more pics in between the last step and here, but I will try and explain what I did.
I stapled the inside edge the whole way around, then flipped it over and screwed from the bottom of the MDF into the padded rail to keep it in place, there was about 20 screws all the way around.
I simply folded the edges of my vinyl in about 12mm (1/2″) on the overlapping sections.
As I pulled the vinyl tight and underneath the table, my friend did the stapling from the bottom. You absolutely need help here, you can not do this step by yourself. I think the fact that there are no photos in between there and here shows that this part of the job can not be taken lightly, you have to do it in one go with help.
The wooden beer rail is placed inside the rail, you may need to do some light sanding to get it to fit properly. You should then screw it from the bottom up to keep it in place.

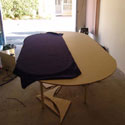
You know whats next .. it’s done! Drop that felt section straight into the middle, you dont have to screw this from the bottom if you don’t want to. I chose not to so that I can easily remove it to clean it or re-cover it.

Ok here it is over the top of my dining table. I have fixed 4 little bits of MDF underneath on either sides of my table to stop it from turning, it can slide long ways (north to south) or come directly up off the table top, but it will not turn if pushed clockwise/anti-clockwise.
So here we are at the end of the project waiting eagerly for my poker chips to arrive.
Read about the different types of poker chips available for purchase online.
Final Thoughts:
I could have used bigger pieces of foam, this would have made it a lot easier to cut the peices I needed. This is completely my fault because I didn’t think about the oversized cut before I bought the materials.
After only 20 hours of use, the cheap felt is already pilling, starting to ball up and wear. Once it gets beer spilt on it, or a hole wears through, I will go to a billiard shop and buy some more expensive snooker table felt or something, you might want to do this first up.
More Poker Table Plans:
29 November 2004 – It has been several months now since I made this table, the felt is long gone, I am using a “Poly Suede” material now. I have refined the process of building the tables and I am creating much better poker tables.
I am about to retire this “original poker table” (and another table I made this year) as the first season of my poker home games has ended. Early 2005, production will begin on making new poker tables for my “season two” home games. I am going to change the colors and the plans a bit. The poker table plans and material modifications will primarily be:
- Single piece of foam – I am going to order an entire sheet of foam and cut the full table sized padded rail out in one (1) or two (2) peices.
- Single piece of vinyl – A whole length of vinyl is used along the table, there are no joins in anywhere and with one peice of foam underneath creates a flawless, perfect padded rail.
- Colors – My new colors are going to be brighter than before, or more professional, I haven’t decided yet.
Made possible by:
AirTools Stapler – Without this tool, the project would not be possible, get a good air stapler, you will not regret it, however an electric stapler will do. I decided to use the air tool as it is far superior and more versatile than the electric counterpart. The cheap air stapler and air compressor costs around $150 (for the two), but the electric one is around $60+ by itself. I found that the air compressor combination is a much wiser tool investment. The actual stapler I used is a cheap Chinese brand, purchased from Bunnings Australia. There seems to be no web reference available.
GMC 24L Air Compressor – The compressor costs $100, best investment ever! This powers the stapler and also helps to clean up the saw dust. Get yourself a simple air jet nozzle to clean up the garage!
Black and Decker FireStorm Drill – Only need this to drill some pilot holes for that jigsaw blade, but I might use the drill a little more if I install cup holders!
Black and Decker Jigsaw – The second most important tool in the job.
Makita Finishing Sander – Limited use, but still important for finishing edges and making stuff fit!